When a Honda Accord Check Fuel Cap message displays on the dashboard of a Honda…
24 December, 2023
0 Comments
1 category
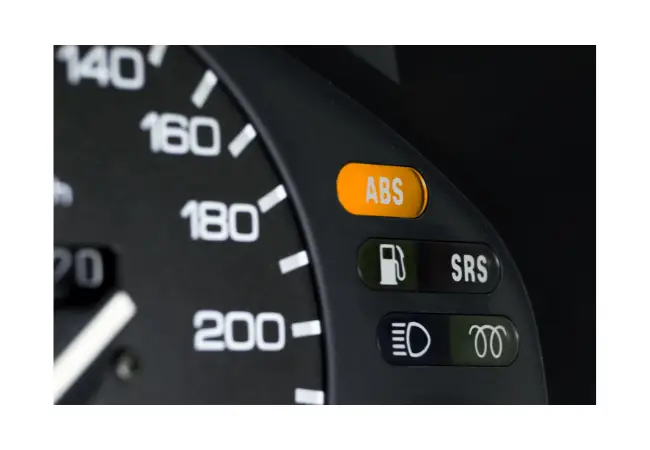
When the check fuel cap light illuminates a vehicle’s dashboard, it serves as an alert that the fuel cap is not properly sealed or could be missing. This small but crucial component of a car’s fuel system is designed to maintain pressure within the fuel tank and prevent fuel vapors from escaping into the atmosphere. The light is part of the vehicle’s onboard diagnostics system, which monitors the performance of various components, including those within the evaporative emission control system.
An improperly fastened or damaged fuel cap can lead to a decrease in fuel efficiency, increased emissions, and potential issues within the evaporative emission system. Drivers should view the light as a prompt to check their fuel cap for correct fitment or to look for possible damage that might need addressing. If the light persists even after ensuring the cap is secure, then further troubleshooting may be necessary to pinpoint and resolve the underlying issue. Typically, this could involve professional inspection or replacing the fuel cap if it’s found to be defective or no longer capable of maintaining a proper seal.
Key Takeaways
- A lit “check fuel cap” light indicates a potential issue with the fuel cap’s seal.
- Ignoring the light can lead to reduced fuel efficiency and increased emissions.
- Resolving the issue may require professional inspection if reaffixing or replacing the cap does not turn off the light.
Understanding Your Vehicle’s Warning Lights
Vehicle warning lights are integral to diagnosing and understanding the health and functionality of various car systems. They signal the need for attention and can help prevent further damage to the vehicle.
Significance of the Check Fuel Cap Light
The Check Fuel Cap Light is a specific indicator on a vehicle’s dashboard that alerts the driver to a potential issue with the fuel cap. The light illuminates when the car’s Powertrain Control Module (PCM) detects an irregularity in the pressure of the fuel system, which might be due to a loose, damaged, or absent fuel cap. A properly sealed fuel cap is essential as it prevents fuel vapors from escaping and ensures optimal fuel system pressure and efficiency.
Common Dashboard Warning Lights
- Check Engine Light: This light indicates a range of issues, from a loose gas cap to a more serious malfunction with the vehicle’s engine or emission control system.
- Oil Pressure Warning: Signals a drop in oil pressure, meaning that the lubrication system needs immediate attention.
- Battery/Charging Alert: Indicates voltage level is below normal and the vehicle’s charging system is not functioning properly.
- Brake System: This light indicates a potential issue with the brake system, which might be as simple as the parking brake being engaged, or as serious as a malfunction in the braking system.
Drivers need to understand the meaning behind these warning lights and take appropriate action to ensure the safety and longevity of their vehicles.
Fuel Cap Basics
The fuel cap is an integral part of a vehicle’s fuel system, providing a seal for the fuel tank. It is designed to maintain the correct pressure within the tank and prevent the release of vapors to the atmosphere.
Functions of a Fuel Cap
- Sealing the Fuel System: A fuel cap ensures that the fuel tank is sealed to prevent gasoline vapors from escaping into the atmosphere, aiding in both environmental protection and fuel efficiency.
- Maintaining Pressure: It plays a crucial role in maintaining the right pressure within the fuel tank.
- Security: The cap acts as a deterrent against fuel theft and tampering.
Symptoms of Fuel Cap Issues
- Check Engine Light or Fuel Cap Indicator: The illumination of these lights may suggest a loose gas cap, a missing fuel cap, or a cap that is not functioning properly.
- Fuel Odor: A strong smell of fuel could indicate a damaged fuel cap or one that is not sealing properly.
- Difficulty Tightening or Removing: If a fuel cap is excessively tight or difficult to remove, it might indicate a problem with the cap’s threading or a defective rubber o-ring.
Fuel caps generally last several years, but various conditions can affect their longevity such as exposure to harsh chemicals or environmental factors. Regular inspection can help ensure they are in good working condition.
Fuel System Maintenance
Regular maintenance of the fuel system is critical for vehicle performance and efficiency. Attention to components such as the fuel cap, fuel tank, and the Evaporative Emission Control System (EVAP) helps prevent fuel evaporation and ensures proper system operation.
Checking the Fuel Cap
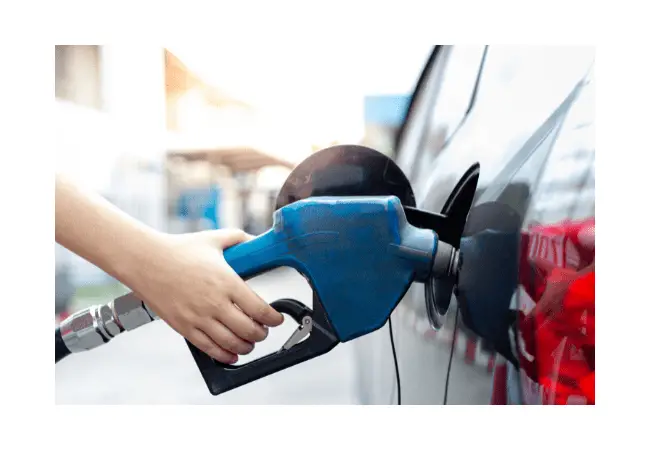
The fuel cap, a crucial part of the EVAP system, should be checked regularly for proper sealing and wear. A loose or damaged cap can cause the “check fuel cap” light to illuminate, indicating potential evaporation of fuel vapors from the gas tank. To check the cap:
- Inspect the seal: Look for any cracks or damage on the rubber seal.
- Ensure tight closure: After refueling, twist the cap until it clicks, signifying a secure seal.
Replacing Fuel Caps and Components
Should inspection reveal issues, replacing the fuel cap or other affected fuel system components is necessary. When selecting a replacement:
- Choose the right fit: Ensure the cap fits the fuel tank filler tube or fuel filler neck properly.
- Quality matters: Opt for OEM (Original Equipment Manufacturer) or equivalent quality caps.
Other components in the EVAP system, such as the fuel pump, charcoal canister, and fuel injectors, may also require periodic inspection and replacement. Following the manufacturer’s guidelines for replacement intervals ensures the longevity and reliability of the fuel system.
Evaporative Emission Control System
The Evaporative Emission Control System (EVAP) is crucial for limiting harmful vapors from the fuel system from entering the atmosphere. It captures and contains evaporative emissions, ensuring that they are not released into the environment.
EVAP System Operation
The EVAP system operates by trapping fuel vapors from the fuel tank and storing them in a charcoal canister. When the engine runs, it pulls these vapors into the intake manifold to be burned during the combustion process. This operation involves various components, including vent valves, purge valves, and the canister itself, working in harmony to manage evaporation and prevent emissions.
- Vent Valve: Allows the tank to vent vapors into the canister.
- Purge Valve: Opens at specific times to allow the engine to burn the collected vapors.
- Canister: Stores hydrocarbons that have evaporated from the fuel.
Diagnosing EVAP System Problems
When diagnosing EVAP system problems, technicians will often start by checking for trouble codes with a diagnostic scan tool. These trouble codes can indicate where a potential leak or malfunction is within the system. A common method for testing for EVAP leaks involves a smoke test, where smoke is introduced into the system, and any escaping smoke points to the leak location.
- P0440-P0457: A range of trouble codes associated with EVAP system issues.
- Smoke Test: A method where smoke is introduced to visually detect leaks.
Common EVAP System Components
- Fuel Tank Cap: Seals the fuel system and maintains pressure, a faulty cap can trigger a ‘Check Fuel Cap’ light.
- Charcoal Canister: Absorbs and stores fuel vapors.
- Purge Solenoid: Controls when vapors are purged to the engine for combustion.
- Fuel Tank Pressure Sensor: Monitors pressure within the fuel tank to detect leaks.
The components listed are integral to maintaining the effectiveness of the EVAP emissions system. An EVAP leak or failure can result in a failed emissions test, and addressing issues early can prevent more significant environmental impact.
Troubleshooting the Check Fuel Cap Light
When the check fuel cap light illuminates on the dashboard, it signifies that the vehicle’s computer has detected a potential issue with the fuel cap or fuel fill inlet, which could lead to evaporative emissions leaks or fuel system pressure changes.
Steps to Diagnose the Warning Message
First, ensure that the fuel cap is properly fastened. Sometimes the light activates simply because the cap is loose or not fully clicked into place. Follow these steps:
- Turn off the engine.
- Locate the fuel fill inlet.
- Remove and then securely reattach the fuel cap, listening for the click.
- Restart the vehicle to see if the light turns off after a short distance.
If the light remains on, inspect the cap for any damage or wear that could prevent a proper seal. Replace the cap if necessary.
Using Code Scanners for Diagnosis
If the check fuel cap message persists, an OBD-II code scanner can be utilized for further diagnosis. These scanners can retrieve codes stored in the vehicle’s computer that pinpoint the issue.
- Connect an OBD-II scanner to the port, usually found under the dashboard.
- Read the codes provided by the scanner.
Look specifically for codes related to the evaporative emission system, which may indicate a leak or issue near the fuel fill inlet.
Identifying False Alarms
Occasionally, the faulty check fuel cap indicator may trigger without an actual issue with the cap or inlet. This could be due to:
- Sensor malfunction: The sensor detecting the seal might be faulty.
- System bug: Temporary system errors can cause a false alarm.
In these cases, it may be necessary to:
- Reset the warning light using an OBD-II scanner, if the initial problem was indeed a false alarm.
- Consult with a professional mechanic to examine the system thoroughly if the light reactivates.
Environmental and Efficiency Concerns
A faulty fuel cap can lead to increased emissions and reduced fuel efficiency in vehicles, raising environmental and performance concerns. Ensuring that fuel caps are properly maintained and function correctly is crucial to address these issues.
Impact of Fuel Caps on Emissions
Fuel caps play a significant role in sealing the fuel system and preventing the escape of fuel vapors into the atmosphere. A compromised fuel cap can result in the release of hydrocarbons, potent pollutants that contribute to smog formation and adversely affect air quality. When a fuel cap doesn’t seal properly, it can trigger the check fuel cap light, indicating a potential emission problem. The regulatory component called the evaporative emission control system (EVAP), is designed to reduce the evaporation of fumes into the environment. A malfunctioning gasket on the fuel cap can disrupt this system, leading to an increase in harmful emissions.
- Common pollutants due to a faulty fuel cap:
- Hydrocarbons (HC)
- Nitrogen oxides (NOx)
- Carbon monoxide (CO)
Fuel Efficiency and Vehicle Performance
The relationship between fuel caps and fuel efficiency is less direct but still relevant. A damaged or ill-fitting fuel cap can allow air to enter the fuel tank, which may disrupt the fuel system’s pressure balance. This imbalance can lead to an incorrect air-to-fuel mixture, which in turn may cause poor acceleration and reduced gas mileage. When the fuel system is compromised, the engine’s control unit can make adjustments that prioritize preventing damage over maintaining fuel economy. The result can be a noticeable decline in miles per gallon, making the vehicle less efficient and increasing its environmental footprint due to higher fuel consumption.
- Performance issues associated with fuel cap problems:
- Poor acceleration
- Lowered gas mileage/fuel economy
By addressing the check fuel cap light promptly and ensuring that fuel caps are functioning as intended, vehicle owners can assist in reducing environmental impact and maintain the vehicle’s efficiency and performance.
Professional Inspection and Services
When the check fuel cap light illuminates, it indicates a potential malfunction in the vehicle’s fuel system. Prompt attention from a professional can ensure both optimal performance and compliance with emission regulations.
When to Visit a Mechanic
They should schedule a visit to a certified mechanic immediately when the check fuel cap light appears on the dashboard. A mechanic will:
- Inspect the fuel cap for proper sealing and signs of damage.
- Conduct a diagnostic test using specialized equipment to read trouble codes from the vehicle’s onboard computer.
- Check the entire fuel system including hoses and seals for leaks that could cause the light to trigger.
Emissions Testing and Certification
Vehicles undergo emissions testing to ensure they are not releasing excessive pollutants into the environment. A certified technician will:
- Perform an emissions test to measure the vehicle’s output of pollutants.
- Verify compliance with state and federal emission standards.
- Use an advanced monitor to detect any malfunction within the emissions control system that might result in a failed test.
A proper inspection by a service professional ensures that the vehicle remains both safe and compliant with environmental regulations.
Preventive Care and Tips
Proper maintenance of the car’s fuel system and due diligence in handling the fuel cap are essential to prevent issues that may trigger the check fuel cap light. This section provides specific steps to ensure the integrity of the system and the proper function of the fuel cap.
Maintaining the Fuel System
Regular inspections of the fuel system are critical for preventing contamination and leaks which can lead to engine damage. A key part of this process is checking for signs of wear or damage to the rubber seals, which are instrumental in maintaining vacuum pressure and preventing fuel vapors from escaping. It’s important to:
- Inspect the fuel cap regularly for signs of cracks or wear.
- Check all fuel lines and connections for tightness to prevent vacuum leaks.
- Replace fuel filters as recommended by the manufacturer to avoid fuel contamination.
- Be vigilant about the presence of dust and debris, which may cause blockages or contamination.
A well-maintained fuel system not only prevents the activation of the warning light but also ensures optimal engine performance and longevity.
Avoiding Common Fuel Cap Problems
To directly tackle issues with the fuel cap, attention should be paid to how it’s handled on a day-to-day basis. The fuel cap must be securely fastened after every refuel to maintain the necessary vacuum pressure in the fuel system. The following points outline best practices:
- Ensure the cap is securely fastened after refueling; it should click to indicate it’s properly closed.
- Do not over-tighten the cap, as this may damage the threads or rubber seal.
- If the cap is lost or damaged, replace it immediately with an OEM (Original Equipment Manufacturer) part to guarantee proper fit and function.
By following these guidelines, the risk of triggering the check fuel cap light due to common fuel cap problems is significantly reduced.
Frequently Asked Questions
When dealing with a check fuel cap light, vehicle owners may have several questions regarding the correct course of action. The following frequently asked questions provide clear and practical guidance.
How can I replace the fuel cap on a Honda Accord?
To replace the fuel cap on a Honda Accord, one should purchase the correct cap from an authorized dealer, open the fuel door, unscrew the existing cap by turning it counterclockwise, and then install the new one by screwing it in clockwise until it clicks.
What should I do if my car’s gas cap warning light turns on?
If the gas cap warning light turns on, the first step should be to ensure the cap is tight and secure. If this doesn’t resolve it, inspect the cap for damage and replace it if needed. Should the light remain on, a visit to a mechanic may be necessary to check for other issues.
Why does the fuel cap warning illuminate even after I’ve replaced the gas cap?
The warning may illuminate even after the gas cap has been replaced if the new cap does not properly seal, if the cap is without the right specifications for the vehicle, or if there is an unrelated issue within the fuel system or Evaporative Emission Control System (EVAP).
What steps are involved in resetting the check fuel cap light on a Honda CRV?
To reset the check fuel cap light on a Honda CRV, one should ensure that the fuel cap is properly secured or replaced if defective, then drive the vehicle for a few days to allow the system to reset, which often occurs automatically.
Is it safe to drive with the fuel cap warning light on, or can it cause harm?
Driving with the fuel cap warning light on is usually safe for a short period, but it can lead to fuel evaporation and increased emissions. Prolonged driving without addressing the issue can cause the vehicle to fail an emissions test or damage the EVAP system.
How much time does it usually take for the fuel cap warning light to reset after corrective action is taken?
The fuel cap warning light typically resets after a few driving cycles once the issue is corrected. This can take anywhere from a day to a week, depending on the vehicle’s internal diagnostics system and driving habits.
Category: Articles
Related Posts
Top Reasons for Low Engine Oil Levels: Causes and Solutions
Engine oil keeps your car running smoothly. When levels drop…
Best windshield wiper brands: Top choices for clear visibility and safety
Windshield wipers are a crucial part of any vehicle's safety…
What Do Tire Rotations Do? How and Why to Rotate Your Tires
Regular tire rotations are a key part of maintaining your…
One Reply to “Check Fuel Cap Light: Understanding Your Vehicle’s Warning Signal”
Comments are closed.